

Crimson Desert Azure Moon Labyrinth Puzzle Guide: Symbols and Solutions
Welcome back to Digital Tech Explorer. I’m TechTalesLeo, and today we are diving deep into the mystical mechanics of Crimson Desert. While we often focus on the latest hardware and GPU benchmarks, the intricate puzzle design in modern RPGs deserves its own technical deep dive. Solving the Azure Moon Labyrinth puzzle is one of the more rewarding challenges in Pywel, requiring players to decipher ancient murals and locate hidden environmental clues to claim the elusive Abyss Cresset.
How to Enter the Labyrinth
Your journey into the Azure Moon Labyrinth begins at Phoniel Ranch. This location serves as a hub for several gaming milestones, but the entrance to the labyrinth is intentionally discreet. Look for a small, unassuming hut within the ranch. Inside, you will find a hidden ladder that leads deep underground.
Once you descend, the atmosphere shifts. The path is riddled with fire traps and falling rubble. For those looking to optimize their run, you can strategically climb around most traps to conserve health. Continue through the corridor until you reach a mechanical lever; pulling this will grant you entry into the main puzzle chamber where the symbol challenge awaits.
The Symbol Puzzle Solution
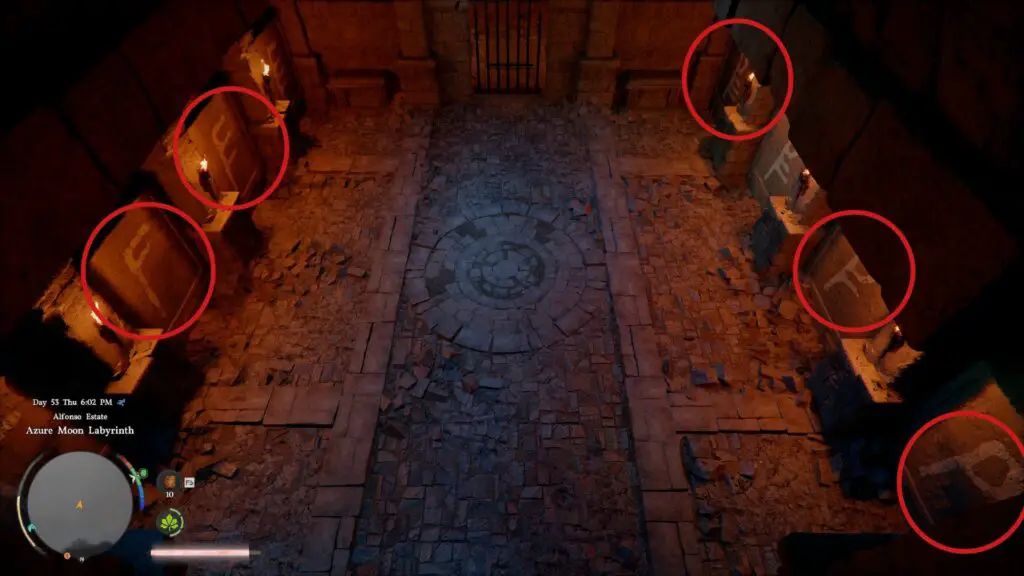
The core of the challenge lies in eight stone slabs, four on each side of the room. While the sequence in which you activate the walls doesn’t matter, the specific symbols you press on those walls are vital for unlocking the Abyss Cresset.
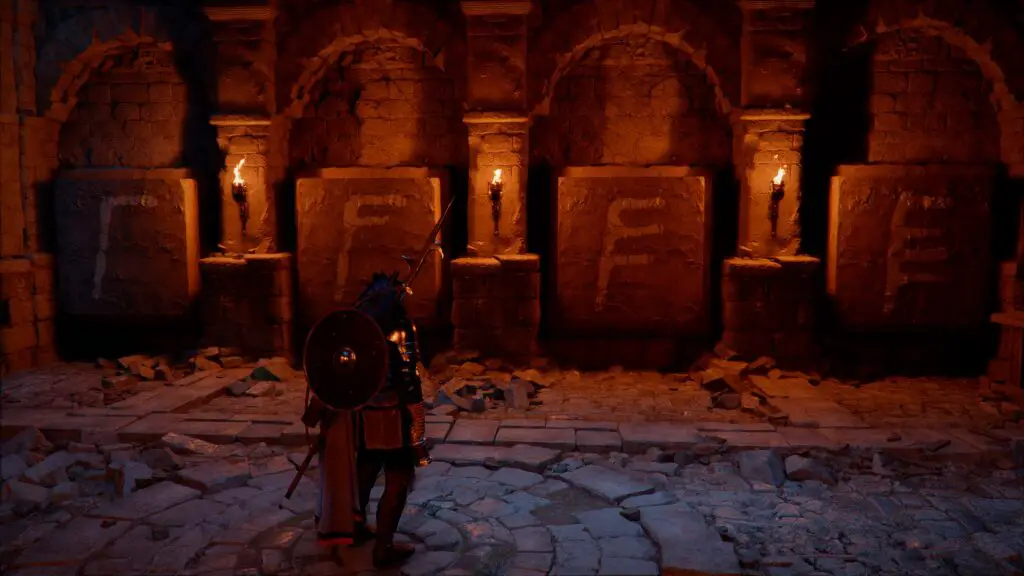
To solve the puzzle, stand facing the closed gate at the end of the chamber. We have numbered the symbols from left to right (1-4) on both the left and right walls for clarity:
| Wall Orientation | Symbol Position | Symbol Description |
|---|---|---|
| Left Wall | Symbol 2 | The Regular “F” shape |
| Left Wall | Symbol 3 | The “E” with a tail |
| Right Wall | Symbol 1 | The “P” with three arms |
| Right Wall | Symbol 3 | The “P” with one arm |
| Right Wall | Symbol 4 | The Regular “P” shape |
The Logic Behind the Symbols
At Digital Tech Explorer, we appreciate the “why” behind the “how.” The logic for this puzzle is hidden in plain sight. If you explore the corridor to the left of the puzzle chamber, you will find a corridor mural.
This mural illustrates five distinct trees found in the Florindale area. Each tree in the game world is marked with one of these symbols. By cross-referencing the symbols on the Florindale trees with the slabs in the labyrinth, players can deduce the sequence. It’s a brilliant bit of environmental storytelling that rewards exploration and attention to detail.
Rewards and Next Steps
Once the gate opens, you can activate the Abyss Cresset. This provides you with a powerful Abyss Artifact, which is essential for character progression and skill enhancement. Furthermore, you will acquire the Memory of Tide. Much like the artifacts found in the Dragon’s Stone Chamber, this item is a key to uncovering secret locations throughout the vast world of Pywel.
For more PC games insights and technical guides, stay tuned to our latest updates.
Explore More Crimson Desert Guides:
- Character Unlocks: How to expand your roster in Pywel.
- Fast Travel Guide: Utilizing Mysterious Energy and the Abyss Nexus.
- Abyss Artifacts: A complete breakdown of power-ups.
- Respec Guide: How to use Faded Abyss Artifacts to reset your build.
- Key Locations: Where to find every hidden key in the game.
About the Author: TechTalesLeo is a dynamic storyteller at Digital Tech Explorer, dedicated to making complex digital innovation and hardware trends accessible to everyone.
Disclaimer: All content on Digital Tech Explorer is for informational and entertainment purposes only. Some links may be affiliate links, which support our research at no additional cost to you.