
If I had a charm for every time I’ve guided players through unlocking a tricky bench in an anticipated title like Hollow Knight: Silksong, I’d have two charms — which isn’t a lot, but it’s certainly noteworthy that it’s happened twice! While the Hunter’s March bench presented its own unique challenge, the Sinner’s Road offers a different kind of ordeal. This area, teeming with formidable foes, indeed hides a bench right in its midst, but it requires a specific, multi-step process to get it functional. As your guide from Digital Tech Explorer, TechTalesLeo is here to light the way through this labyrinthine task, helping you make informed decisions and enhance your gaming skills.
Initial Navigation to the Central Chamber
First, ensure you’re well-prepared for the journey ahead – consider it gathering your “rosaries” of patience and resources for the trials to come. Begin at the halfway home bench, ascend the elevator, then deftly hop across the rickety platforms to enter Sinner’s Road proper. Navigate past the lurking canine-like enemies in the long hallway (utilizing cages for cover can be a lifesaver) until you arrive at the central chamber.
Instead of heading directly right, execute a precise wall-jump upwards and proceed into the room indicated on your map. Work your way through, conquering bugs and intricate jumping puzzles, until you loop back into the central chamber.
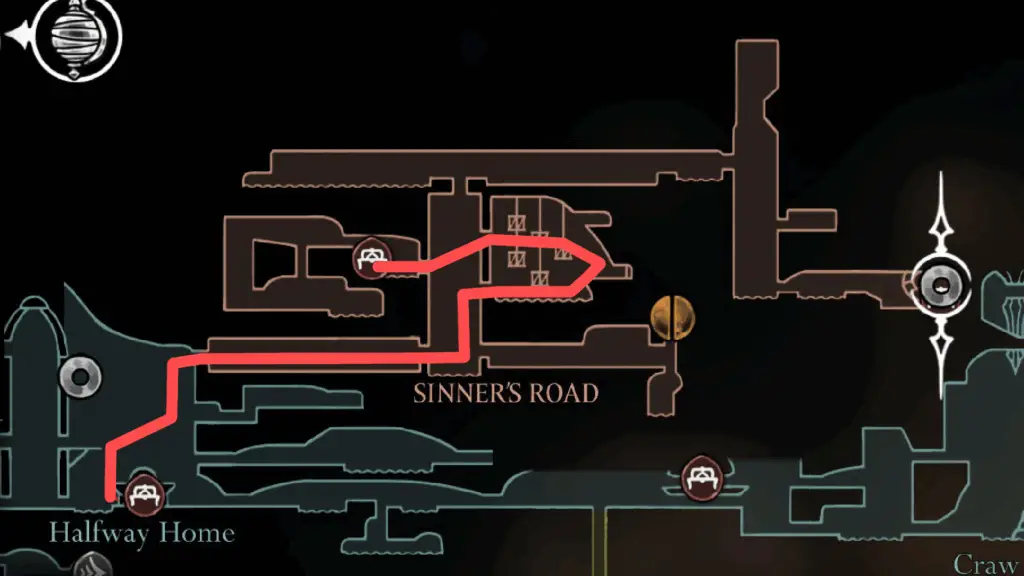
Activating the Bench Shortcut
This next step is crucial for efficiency: do not head straight for the bench room yet. Instead, continue climbing higher until you spot two metal boxes adorned with spikes on their right sides. Drop down from this point and strike the lever. This action will unlock a cage, creating a valuable shortcut back to the bench room.
You might wonder why a shortcut is necessary when the bench appears so close. Unfortunately, the bench is completely broken and unusable at this stage, even after all your navigational efforts (your “rosaries” of progress). However, unlocking this shortcut now is an investment in your sanity, as the subsequent jumping puzzle is notoriously challenging, and having a quick return path will be invaluable.
Conquering the Jumping Puzzle
From the bench room, wall-jump up and to the left — at the very top, you’ll discover a breakable wall leading to a demanding jumping puzzle. It’s a true test of skill, so make sure you’ve metaphorically “spent your rosaries” on preparation and have your platforming prowess ready. A key tip: remember you can diagonally strike the spikes in this room, allowing you to pogo and strategically damage-boost through some of the more difficult sections.

Once you successfully navigate this gauntlet, you’ll be able to activate the gears, finally un-gunking them and unlocking the bench. Yes, if you perish, you’ll face the dreaded run-back. Yes, every single time. And yes, it feels like a boss run-back just for a bench. It’s a frustratingly difficult task that challenges even seasoned players, but with this guide from TechTalesLeo on Digital Tech Explorer, you’re now equipped to master it and emerge victorious!