

Embarking on the quest to locate all five elusive fleas for Fleamaster Mooshka in Hollow Knight: Silksong presents a charming challenge, reminiscent of collecting grubs in the original, but with a unique twist. Unlike the vast numbers in its predecessor, your initial task is to uncover just five fleas scattered across Pharloom’s lower regions. As your guide from Digital Tech Explorer, I’m TechTalesLeo, and I’m here to lead you through “The Lost Fleas” quest. You’ll begin this journey with Fleamaster Mooshka in The Marrow, soon after venturing out of Bone Bottom. These initial five are all nestled in areas preceding Greymoor and Pharloom’s higher reaches. This guide will meticulously detail each of their locations, and then illuminate how to pinpoint the rest of these tiny adventurers on your map as your journey unfolds.

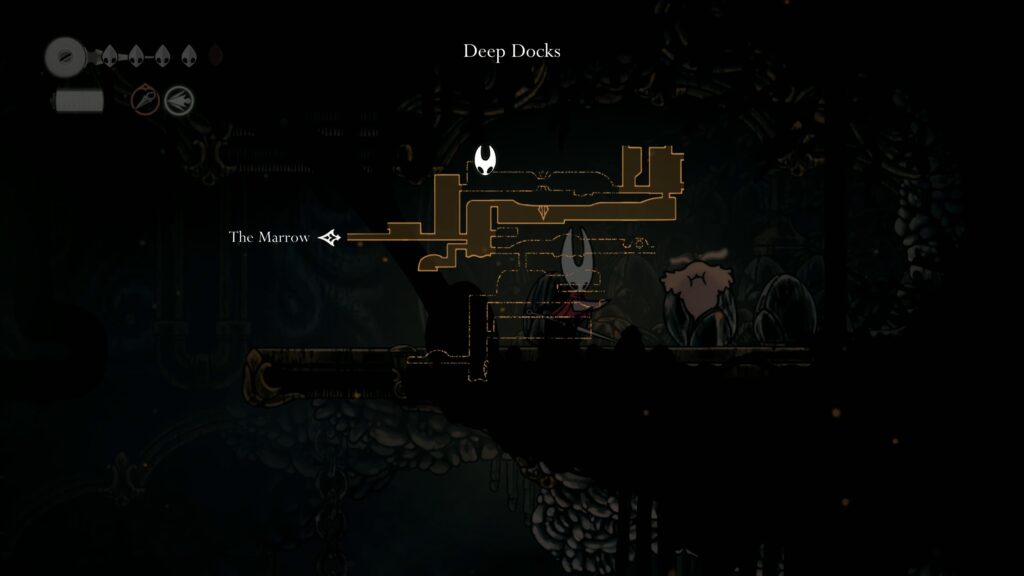
Flea location #1: The Marrow
The first flea is located in The Marrow shortly after you defeat the Bell Beast.
- Head right out of the boss arena, past the bench room, and right into the big open chamber.
- Hit the lever that opens the shortcut, but instead of going right into the Deep Docks, climb the platforms to the top of the chamber and into the room above.
- The flea is in the upper right corner of the room—head left along the platforms and ascend up to the top, then drop down just after you fight the second big skull enemy to find the flea in some vines.
Flea location #2: Deep Docks Bellway
This flea is straightforward to find. In the Deep Docks Bellway, smash the left-hand wall (just to the left of where the Bell Beast stands—you might have to jump a bit). You’ll enter a room with a lava-based platforming puzzle, but it’ll lead to the flea which is directly above the entrance.
Flea location #3: Also Deep Docks
Another accessible find. Right after you acquire the Swift Step ability from the shrine, use it to jump left across the platforms in that same room. Hit the lever at the far end to lower the bell and use it to jump up to the section above where the flea is trapped.
Flea location #4: Far Fields
The fourth flea is in Far Fields. To get there, you need to:
- Head to Far Fields Bellway (you’ll need the Drifter’s Cloak you get from the Seamstress to reach this area), then exit and jump left across the chasm and into the room on the other side.
- Head left across the platforms and up into the next room.
- Go to the far right side of this next room and smash a secret wall.
- Hop up a couple of platforms to spot a passage on the right blocked by some bone containers.
- Smash these and head inside (be warned, a red ant will catch you, so smash out of the cage), then smash the flea’s cage to free it.
There is an alternate way if you don’t have the Drifter’s Cloak yet. While heading into Far Fields via the main path, look for two red ants on a platform above you, huddled around a lantern. From here, you can sprint and jump up the platforms to reach the top of the room instead (and then proceed from step 2 in the list above).
Seeking more in-depth knowledge on your journey through Pharloom? Explore Digital Tech Explorer’s comprehensive guides on topics like:
- Locating all Silksong simple key locations
- Discovering the Silksong Hokers location to support the Seamstress
- Finding the elusive Hunter’s March bench

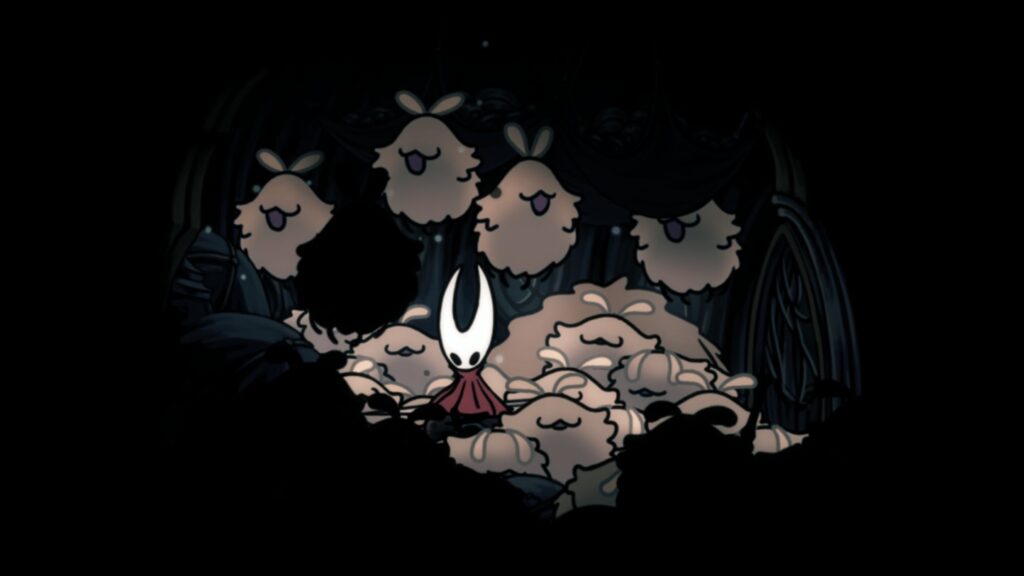
Flea location #5: Hunters March
The final flea awaits in the Hunter’s March area. You’ll need to defeat the formidable red ant boss guarding the passage on the far right side of The Marrow, a task made simpler once you acquire the Swift Step ability. This passage is located to the right, above the prison with the bench where you first encounter Grindle, should you lose your way. After the boss is vanquished, simply use downward attacks on the red orbs to bounce your way up to the very top of the next room, where the flea can finally be found.
Once all five initial fleas are reunited, return to Fleamaster Mooshka. He will guide you to the far left side of Greymoor, effectively allowing you to bypass a significant portion of the main path. As an added bonus, speaking with the other fleas at the caravan will grant you three charges of Flea Brew, providing a temporary boost to your movement speed and attacks.
How to find the remaining fleas in Silksong
Once you advance to Act 2 and gain the Faydown Cloak double jump ability from Mount Fay, or alternatively access the Putrified Ducts by defeating Groal the Great in Bilewater, you’ll have the opportunity to meet a flea hunter named Vog who will mark additional flea locations on your map in exchange for Rosaries.
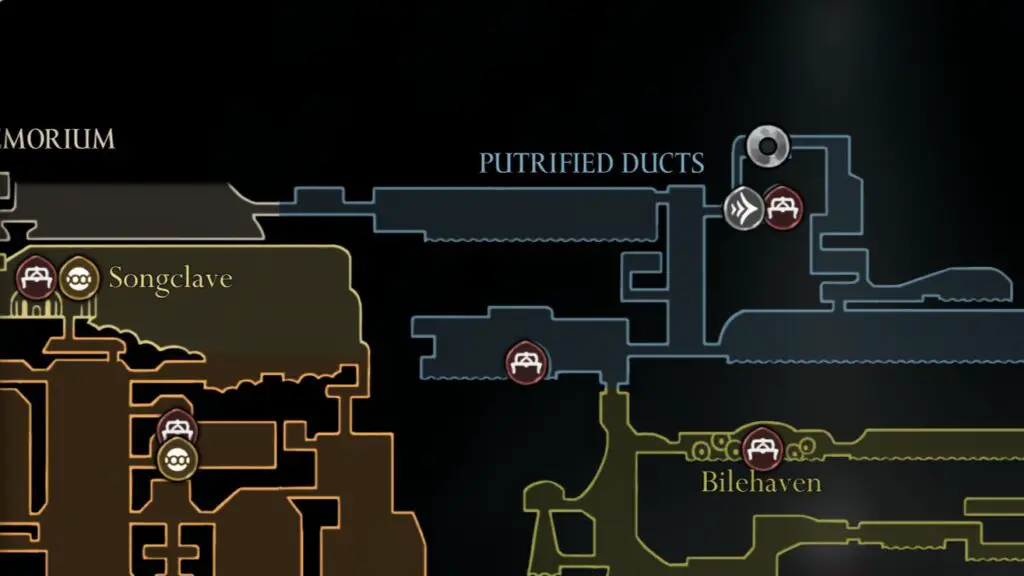
You’ll also need the Clawline ability, which you acquire from the right side of the Underworks. This area is accessible through Whiteward if you obtain the White Key to the right of the First Shrine and unlock the elevator on the bottom level of the Choral Chambers. Alternatively, you can use the elevator near The Stage in the Whispering Vaults, accessible through the lower Cogwork Core once you’ve defeated the Cogwork Dancers.
To begin your journey to the Putrified Ducts, head towards the Cogwork Dancers boss arena from the First Shrine in the top right of the Choral Chambers, then double jump up into the Memorium area. On the far right of Memorium, you’ll discover an exit onto a strut where a swarm of bats will attack you—incidentally, this is also where you’ll find Jubilana during the Lost Merchant quest.
Proceed to the far end and jump up to locate the entrance to the Putrified Ducts. Once you’ve found the region’s Bellway, you’ll want to:
- Exit the Bellway, drop down to the bottom of the shaft, and proceed right into the next room.
- Go to the far right side of the long chamber and use the platforms to climb up before smashing a secret wall at the top on the left.
- Make your way left along the platforms before jumping up into the room above.
- Head right and jump over the spikes, allowing the roof enemy to snatch you with its tongue and drag you up into a hidden space with a jumping puzzle.
- You’ll need to get grabbed a couple more times by other roof enemies to complete the puzzle and reach Vog at the top.
Speak to Vog, and she will then relocate to the Flea Caravan, where she will allow you to purchase any flea locations you have yet to discover. If your Rosary count is low, consider exploring our Act 2 Rosary farm guide for efficient collection. Once you’ve successfully rescued all the fleas, reached Act 3, and informed Fleamaster Mooshka about the Pale Lake (also found to the right of the Putrified Ducts), you’ll be able to participate in the Ecstasy of the End quest, which rewards you with valuable Pale Oil.
We at Digital Tech Explorer are committed to helping you navigate the exciting world of technology and gaming. Stay tuned for more in-depth guides and insights to enhance your adventure!